QuickMitts
Designed by Christy Petersen Love Knot Design All rights reserved. Do not sell pattern. Personal use only.
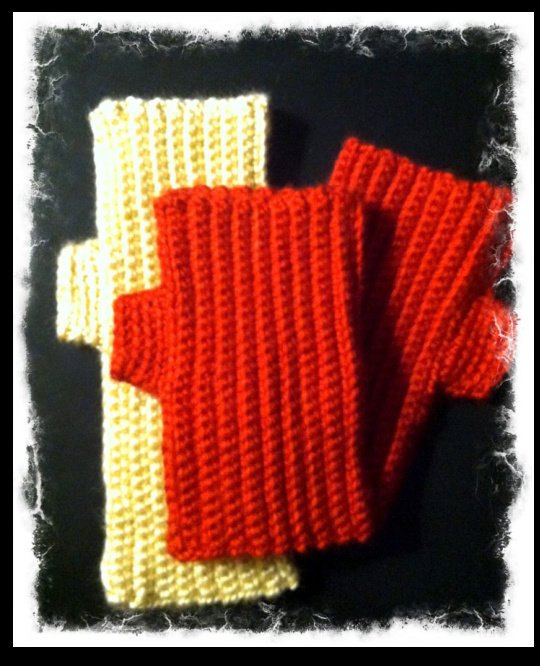
Quick mitts are a super simple way to keep warm while still having use of your fingers. They are great for everything from soccer practice on chilly days to typing in a cold office. Don't forget about texting, too. They can be made to fit any size hand, and made as long or as short as you wish. They make awesome last minute gifts too! Skill Level: Beginner—US crochet terms Average completion Time: 4hours Dimensions: Adult Small
Materials:
3 to 4 oz Caron Simply Soft yarn, or similar. G hook, 4 mm Yarn Needle Gauge: Not critical
Stitches and Abbreviations:
Chain ch Slip Stitch slst Stitch st Single Crochet SC Yarn Over yo Decrease \* dec Back Loop Only\* blo \* See Stitch Notes, page 2.
Tips:
Lighter or heavier yarn may be used, adjusting hook size accordingly. Yarn substitu. tions will affect finished dimensions. Sizing is simply adjusted by crocheting fewer, or more, rows and/or making a longer starting chain. Your gauge may differ, and therefore require ore or less starting chains to get your desired length. Crocheting with a tighter tension than normal will result in a more resilient stretch to the fabric. It will make the mitt fit more snugly in the wrist, which is a good thing.
Stitch Notes
Single Crochet Back Loop Only (sc blo)
Place hook under back loop of next st., yo and draw up loop, you and draw up through both loops. See Figure 1
Decrease back Loop Only (dec blo)
Place hook under back loop of first st, yo and pull up loop, place hook under back loop of next st, yo and pull up loop, yo and pull yarn through all loops on hook.
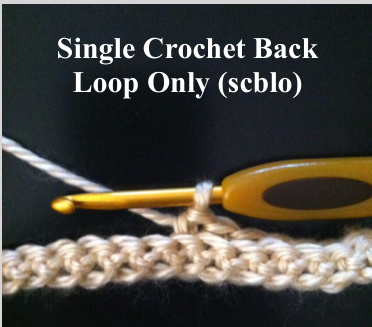
Figure 1
Pattern Instructions
Red Mitt:
Size Adult Small/ Medium (shorter length) Chain 31 Row1: Sc into 2nd ch from hook. Sc in each ch across to end of starting chain. Ch1, turn. (30sc) Row2: sc blo (See Figure 1) into each st across. Ch1, turn. Row 3—36: Repeat Row 2. Sew long sides together and create thumb hole as follows. Note 1: When working through both thicknesses, you'll want to minimize the appearance of the seam. To do this: fold your work lengthwise. Put hook under back loop of the sc and under the back of the chain from the original starting chain, yo and pull up loop twice. (If minimizing seam appearance isn't important to you, just sc through both thicknesses and don't worry about working blo.)
Seaming (See Figure 2)
Section (A) Work 8 sc, crocheting through both thicknesses. Section (B) Work next 9 sc blo into 1 thickness, skipping the 9 corresponding chains on the second thickness. This creates thumb hole. (See Figure 3) Section (C) Work 13 sc through both thicknesses. (See Figure 4) Finish off.
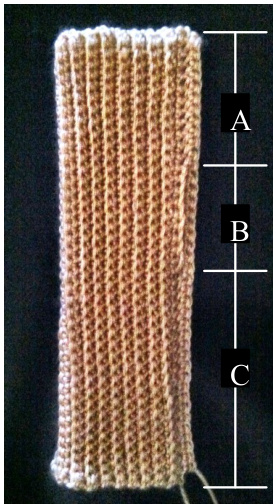
Figure 2
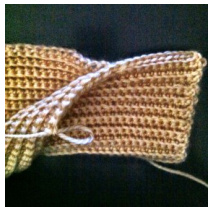
Figure 3
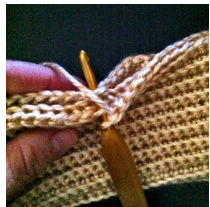
Figure 4 (Continued from page 2) If you prefer a mitt with no thumb, stop here.
Thumb:
Base: (See Figure 5) Join yarn with a slst into the last chain that you skipped when creating thumb hole. Ch 1. Sc into same ch as joining and in next 8 ch. Join With a slst into the first sc made when creating the thumb hole. Rnd 1: Ch 1, sc blo around thumb; - do not join (18sc) Rnd 2: Sc blo next 8 st. Dec blo, sc blo in next 8 st. Do not join (17 sc) Rnd 3: Sc blo next 7 st. Dec blo, sc blo next 8 st. Join with a slst. (16sc) FinishOff
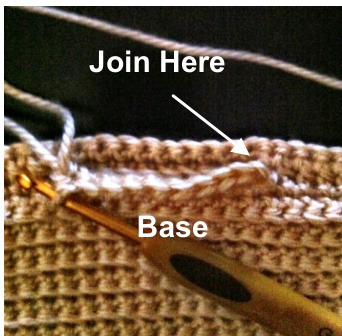
Figure 5 Note 2: If you have larger thumbs, just increase the number of stitches worked over section (B).
Beige Mitt:

Size Adult Small/ Medium Ch 41 Row 1—36 same as Red Mitt Sew long sides together and create thumb holes. See Note 1 above.
Seaming
Section (A) Work 12 sc, crocheting through both thicknesses. Section (B) Work 9 sc blo into 1 thickness, skipping the 9 corresponding chains on the second thickness. This creates thumb hole. Section (C) Work 19 sc through both thicknesses. Finish off.
Thumb:
Same as for Red Mitt For Adult large, work 40 rows before sewing together and adjust thumb size as necessary by increasing the number of sc worked on section B of seaming. Please feel free to share pictures of your finished products with me on Ravelry! Look for my project page under LoveKnotDesign Thank you for your purchase. I welcome your questions and comments. Find my blog at http://whatknots.blogspot.com.


