Binic
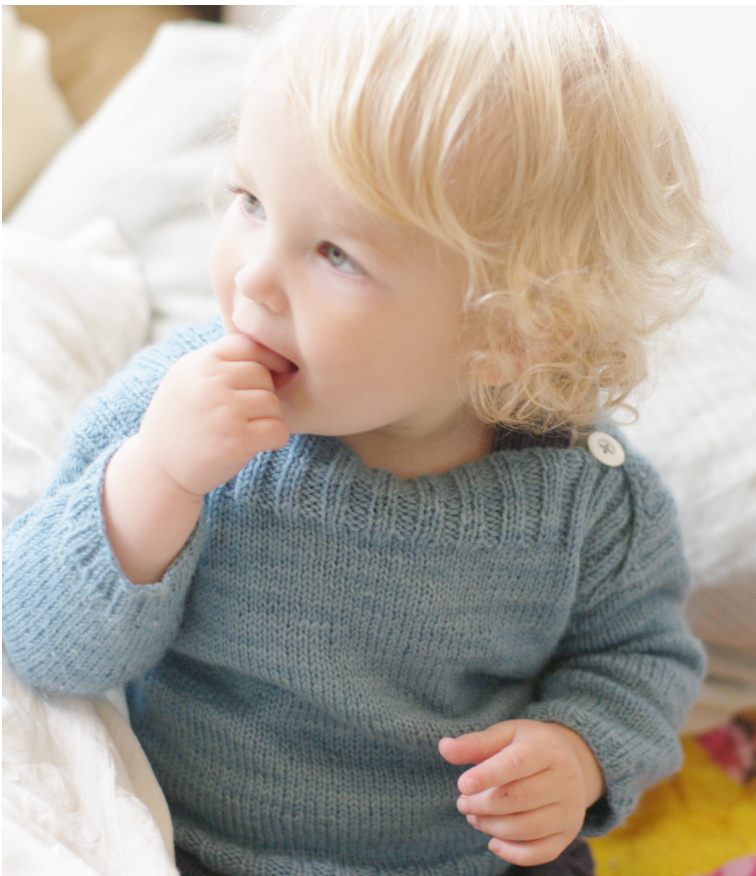
Finished size: 18/24 months Chest circumference: approx. 60 cm Length of garment: approx. 29 cm
Techniques used:
Knitting in the round (using circular needle and magic loop or dpn's); short row shaping using my new favorite method thought up by Alice Yu and detailed in this blog entry: Socktopus; picking up stitches. By Solenn Couix-Loarer Translation: Sonya Malaborza (mazeborza on Ravelry) Gauge: 24 sts and 36 rows = 10 cm by 10 cm on larger needles (4 mm). Yarn: Approx. 400 m of Sport or Fingering weight yarn (sample was knit up using a little over one skein of Rennaissance Dyeing “Poll Dorset 4 ply", 350 m / 100 g, home dyed with indigo). Also, two buttons (1.7 cm in diameter). Notions: 2 60-cm circular needles: 3,5 mm and 4 mm (or size needed to optain gauge); tapestry needle, and perhaps dpn's should you decide to use them.
BODY AND BACK (KNIT IN THE ROUND)
Cast on I44 sts on circular needles using smaller needles (3,5 mm). Place a marker and join in the round, taking care not to twist. Knit 15 rows in 2x2 ribbing (K2, P2). Switch tolargerneedle size (4mm)and continue.in sctockinette. sctitch.until niece cotmue mstockinette stitcnuntnplece measures 17 cm or so from cast-on edge.
FRONT AND BACK PANEL (KNIT BACK AND FORTH)
Knit 72 stitches and place remaining stitches onto holder (these will form your back panel). Knit back and forth in stockinette stitch for 16 rows, or until section measures 4.5 cm (22.5 cm from cast-on edge). Continue in 2x2 ribbing (K2, P2) for another 22 rows, or 6 cm, repeating the following rows: Row I (RS): sl I, \*K2, P2, repeat from \* until 3 sts remain; K2, sl I. Row 2 (WS): Kl, \* P2, K2, repeat from \* until 3 sts remain; P2, K1. Your piece should now measure 28.5 cm from cast-on edge.
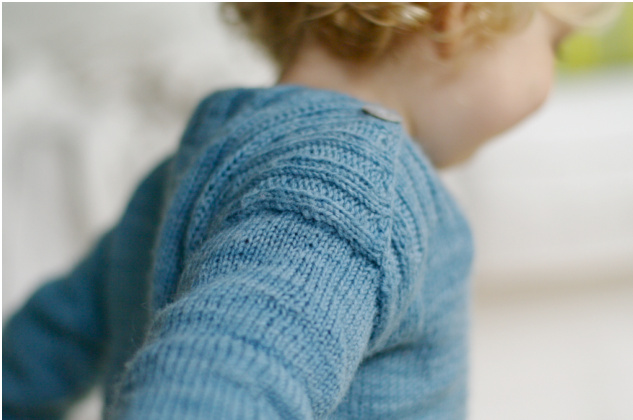
SHOULDER SHAPING (USING SHORT ROWS) Left shoulder (front) / right shoulder (back)
Short row I(RS): sl I, knit 23 sts in pattern (6 knit ribs); wyif, slip I st purlwise onto right needle and purl together with stitch from row below. Slide stitch back onto left needle: one twinned stitch. Turn work. Short row 2 (WS): Knit in pattern to end of row. Short row 3 (RS): Slip I stitch, knit in pattern to 4 sts from twinned st; slip next stitch purlwise onto right needle and purl together with stitch from row below. Slide stitch back onto left needle: one twinned stitch. Turn work. Repeat last 2 rows 4 more times, then knit short row 2 (Ws) once more. We have 6 twinned stitches. Next row (RS): Knit in pattern to ribbed section, then continue working across row, knitting twinned stitches together.
Right shoulder (front) / left shoulder (back)
Short row 1 (WS): Knit 23 sts in pattern (5 knit ribs, 6 purled ribs); wyib, knit next st together with st from row below. Slide stitch back onto left needle: one twinned stitch. Turn work. Short row 2 (RS): Knit in pattern to last stitch; slip I stitch. Short row 3 (WS): Knit in pattern to 4 sts from last wrapped st; wyib, knit into st from row below. Slide stitch back onto left needle: one twinned stitch. Turn work. Repeat last 2 rows 4 more times. Next row (RS): Knit in pattern, working twinned stitches together. Next row (WS): Bind offstitches in pattern.
Repeat instructions for center panel and shoulder shaping for front of garment.
Front and back pieces of garment are symmetrical. Follow shaping instructions in reverse order (front left shoulder to shape back right shoulder and right front shoulder to shape back left shoulder).
SLEEVES
Using a tapestry needle and a strand of yarn, finish the collar openings by overlapping the triangular sections which form the openings for your armholes. Make sure the front and back necklines line up properly. Starting at armpit level, pick up 52 stitches (at a rate of 2stsover 3 rows)along thearm opening; stitches at collar level will be picked up through two layers; take care to keep stitches in line. (Should you be unable to pick up the exact number of stitches, be sure you've got a multiple of four stitches before reaching the cuff section.) Place marker (m) to indicate beginning of round and knit in the round in stockinette stitch (switch to dpn's or use the Magic Loop method) until sleeves measure 16.5 cm, or 1.5 cm from desired length. Switching to smaller needles, knit 5 rounds in 2x2 ribbing. Bind off in pattern. Diameter of cuff: approx. 2 1 cm. Note: should you prefer a garment with narrower cuffs, knit the following decrease row 4 times, on every 12th row: Kl, ssk, knit to I st from marker, K2tog, Kl, sl marker. (50, then 48, 46, 44 sts total). Diameter of cuff: approx. I 8 cm. Repeat instructions for second sleeve.
FINISHING
Buttons and buttonholes: Buttons on original design were added as an afterthought on finished collar in order to play down the onesy look and keep the neck opening closed. Option I (with buttonhole): You can easily stretch out a few stitches to improvise a buttonhole (stitch around them if needed) (that's what I did). Or, you can create buttonholes by inserting a "yo, k2tog" at the front shoulder's first short row (this way, you can use a bigger button). Option 2 (without buttonhole): The neck opening is large enough that you could always sew buttons through both layers, thus sewing it permanently, and still have enough room to get the head through. Weave in ends, wash and block garment, making sure you stretch it out slightly. Once it's dry, slip it on and run to the beach! This pattern is for your personal non-commercial use only. You may not distribute or sell electronic or printed copiesofthispattern,nor sell anyitemsmadefromthese instructions without the express permission of Solenn Couix-Loarer. Thank you!


