BALLSHAPEDJARCOVER By Tanya Brunswick 05/07/2015
Materials Any Cotton #10 thread Hook: (2) or a 2.25
Terminology
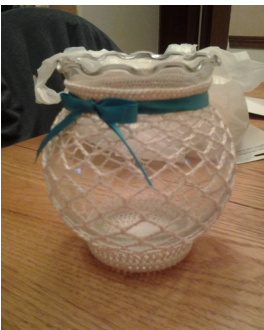
Ch Chain S1 Slip stitch Dc Double Crochet Sc Single Crochet This pattern works up fairly quick and really dresses up a plain ball jar for a candle holder or whatever you may choose to use it for. This is not removable once you put it on the jar. As long as your jar is dishwasher safe, you should be able to put this in the dishwasher with no issues. RD 1: Make a magic ring and ch 3. (counts as first dc here and throughout). Dc in the ring 9 more times. Join with a sl into the 3rd chain of the ch 3. Pull circle tight. (10 dc) RD 2: Ch 3. 1 dc in same stitch. 2 dc in each stitch around. Join with a sl into the 3rd chain of the ch3. (20 dc) RD 4: Ch 3. dc in same stitch. \* 1 dc in next 2 stitches, 2 dc in next stitch\*. Repeat around. Join with a sl into the 3rd chain of the ch 3. (40) RD 5: Ch 3. Ch 3. dc in same stitch. \* 1 dc in next 3 stitches, 2 dc in next stitch\*. Repeat around. Join with a sl into the 3rd chain of the ch 3. (50) RD 6: Ch 3. dc in each st around. Join with a sl into the 3rd chain of the ch 3. (50 dc) RD 7: Ch 3. dc in back st only of each st around. Join with a sl into the 3"d chain of the ch 3. (50 dc) 1 stitch around. Join with a sl into the 3rd chain of the ch 3. (50 dc) RD 9: Ch 5. Sk 2 st, sc in next (3rd st). \*Ch 5, sc in 3"d st\*. Repeat from \* to \* around. Sl in first st of ch 5. ( You may have to do just one stitch in between the last instead of skipping two stitches.) RD 10: Sl in next 3 st of the ch 5 of previous rd. Ch 6, sc in each ch 5 sp\*. Repeat from \* to \* around. (At this point I started using a stitch marker to mark the start of each new row). RD 11-15: \*Ch 6, sc in each ch 6 space\*. Repeat from \* to \* around. (Rem to move stitch marker up with each row). RD 16: \*Ch 5 sc in each ch 6 space \*. Repeat from \* to \* around. RD 17: Ch 4, sc in each chain 5 sp\*. Repeat from \* to \* around. (Place cover in jar a few stitches before done with this row. It will be pretty loose, but just try to keep it as straight as possible, it will get tighter as you go along). RD 18: \*Ch 3, sc in each ch 4 sp\*. Repeat from \* to \* around. RD19: \*Ch 2, sc in each ch 3 sp\*. Repeat from \* to \* around. RD 20: \*Ch 2, sc in each ch 2 sp\*. Repeat from \* to \* around. RD 21: 4 sc in each ch 2 sp. 1 sc in each sc. Join with a sl into 1st sc. RD 22: Dc in each sc around. Join with a sl into 1"t dc. RD 23: Dc in each dc around. Join with a sl to first dc. Fasten off and run thread thru back side of stitches to hide.
This pattern belongs to me, Tanya Brunswick. Please use for personal use only. DO NOT post to any website!! You may make the item and sell it, but please give credit to me for designing the pattern. DO NOT sell this pattern for any reason. If you have any questions please email me at tbrunswick68@gmail.com or find me on facebook and send me a message. 5/07/2015


